Type on a Path in InDesign Tutorial
We are taking a look at how the Type on a Path Tool can give your typography a curved, fluid style that looks fantastic layered over photography.
In this series of tutorials, How Did They Do That?, we dissect the tricks used by graphic design pros and share surprisingly simple tips that will make your InDesign work look ultra-professional, even if you’re a beginner to the software!
Examples of the Type on a Path Tool

We’re going to focus on how the Type on a Path Tool can be used in magazine design. Image + typography might be the consistent formula for selling issues, but this doesn’t mean the formula needs to be conventional. Magazine designers are always on the lookout for new ways to reinvent their covers.
Layering text in interesting, fluid ways over the top of striking photography is an attention-grabbing way to make covers look more artistic and exciting. It’s also a great technique for making the text interact more naturally with the curves, lines and shapes of an image.

Text is positioned along the curves of Sophie Hicks’ head, from Fraulein Magazine

Graffiti-style headers sit on irregular baselines, from Elle Indonesia

A chalkboard-style cover, from Milwaukee Magazine
This technique might look tricky, but it’s anything but. You can recreate the style easily in Adobe InDesign with the Type on a Path and Pen Tools.
It all comes down to a few simple steps…
Step 1: Create a New Layer for Your Typography
Create a basic cover in Adobe InDesign, to a size that you prefer. On the existing layer, use the Rectangle Frame Tool (F) to create a new image frame, and File > Place a photo in the frame.

Look for photos with strong shapes and curves—portraits of people work well, as do aerial photos with plenty of white space in-between items on the photo (this doesn’t have to be actually white, just one plain background color which will allow text to appear legible).
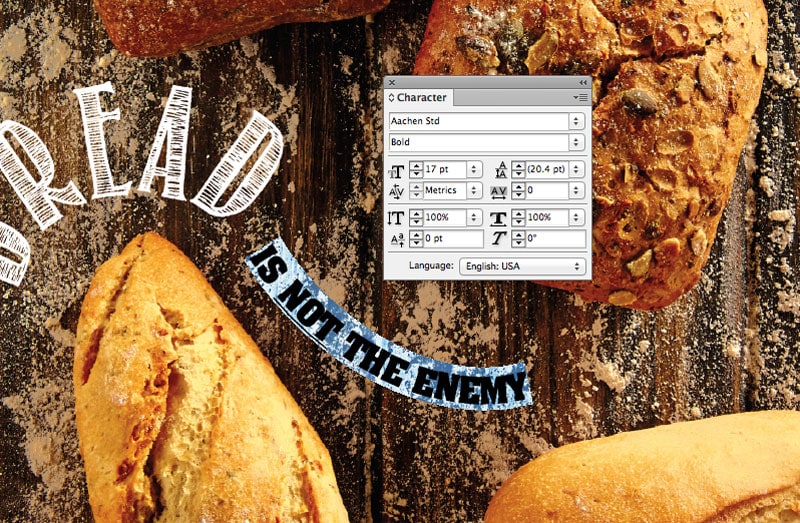
I’ve used this aerial shot of rolls of bread on a wooden board. There’s plenty of curves and lots of space for placing text, without being interrupted with too much detail beneath.
Create a new layer from the Layers panel (choose New Layer from the panel’s drop-down menu), and rename the layer Typography.

Lock the bottom layer, to avoid moving the photo around by mistake. You can make room for a header, and subtitle at the top of the page.

Step 2: Use the Pen Tool (P)
From the Tools panel choose the Pen Tool, or hit P on the keyboard.

You can use the Pen Tool in two ways. One, by simply clicking onto the page and creating a series of joined straight lines. The second way, which we’re going to use here, is to click and drag onto the page to create a curved line, then click again to create a second curve joined to the first and so on
Move across to the pasteboard, next to the page, to experiment with creating curved lines with the Pen Tool. You can do this quite easily without a graphics tablet, but it might take a little bit of practice to get the curves looking really smooth and fluid.

Move back onto the page, and use the Pen Tool to draw smooth curves around one section of your selected photo.
You can use the Direct Selection Tool (A) to select the anchor points and handlesof the line, and adjust them by either dragging or using the arrows on the keyboard. You may also find it useful to set the Stroke Color of the line to a bright, contrasting color for now, to make it easier to see.

Step 3: Use the Type on a Path Tool (Shift+T)
Once you’ve created your line, head back over to the Tools panel. From the Type Tool drop-down menu, choose the Type on a Path Tool (Shift+T).
Hover your cursor over one edge of the line and click once. The curved line will be transformed into a type path. You can now type in text, and apply formatting in the same way as you would for text in a text frame.
Remove the color of the Stroke and set it to [None].
Here, I’ve used two fonts to create a bold, uppercase effect, set in a white, [Paper], color—Aachen Std…

…and Return to Sender.

Repeat the process, using the Pen Tool (P) to draw curved lines around parts of the photo, and then transform them into text paths using the Type on a Path Tool (Shift+T).

Format the text using the Formatting Controls panel at the top of the workspace, or from the Character panel (Window > Type & Tables > Character). Vary the Font Size, Font and Color to create an eclectic, interesting look.

Great work! Try applying the technique to different photos and layouts—this effect also looks great on posters and cards.